a long time ago, marco turned 4 years old

Hi there!

For those of you who have been following the different facets of this blog, you know that I’ve posted in the past a lot of my cooking recipes and some of my motherhood experiences and all the things I create for my kid’s birthdays besides all my calligraphy adventures.

So today, I decided to do a #TBT to Marco’s 4th bday party which I hadn’t shared here.

First. let’s talk about the theme. My kid wants to be a Race Car Driver and he’s a totally fan of anything with a motor and wheels. So, there we went. A Hot Wheels celebration! 

I made him two cakes, one mini cake for home and one bigger to bring to his preschool. This time I tried an amazing chocolate cake that I found here. What I like the most  about this one is that it doesn’t have any coffee on it and -truth to be told- I think it’s a little bit easier than the most amazing chocolate cake I did the year before that.

It’s a very thin batter but no worries, it comes out so moist and soft… delicious! I filled the bigger cake with slices of organic strawberries and organic heavy whipping cream that I previously mixed with some organic powdered sugar (kind of a Chantilly cream) and a green food colorant.

For the decoration, I covered it with the same heavy whipping cream and I used a piece of black fondant to create kind of a route and the rocks where made out of chocolate! I got these here.

The smaller cake, I filled it with organic raspberries and this chocolate ganache. Out of this world. Love this combination!

I covered it with the black fondant, added some of the chocolate rocks and a Grave Digger Monster Truck (this is a Hot wheels party, remember, cars and monster trucks are allowed!)

I got some hot wheels cups and plates for the school party so we used three of those in our intimate celebration. I found this piece of black “chalkboard paper” at Target and it was a great addition to the decor! I used it as a route on our table.

I got to play with a simple hand-lettering using a chalk-board marker on the paper (this was June 2016, amazing how much my lettering has improved!).

I also did some small tags for the goody bags for his school. For these, I did use a straight pen-holder and nib.

Here’s how everything looked in the morning!

Black and white paper straws and the race flags picks were cute ideas to add and of course… balloons! I did the tassel garland with black crepe paper for a big white balloon that doesn’t appear in the pic!

Someone was super happy when he woke up to see this surprise!

Well, that’s it for this week. Next week, I’ll be sharing more about his 5th birthday! Stay tuned!

PS: You can also check when he turned 3 years for another kind of cars and trucks celebration and the 2 years bday party, when everything was about trains.

Brush-lettering: Valentine’s photo-shoot backdrop

Hi there!

Besides being an artist, you also know that I’m a mom, and one of the things I enjoy a lot is when I get to use my artistic skills to help at my kid’s classroom or in general with his school.

I’m also one of the room parents for his class so I get to be involved in the organization of the events that we plan. It’s a nice experience for me also because since I didn’t go to school in America, I get to learn a lot about how this whole thing works here.

Now. This week I want to share a simple brush lettering idea that I used for the Kinder’s Valentines Party.

Materials:

  • Pink paper (Dollar Tree)
  • Dr. Ph. Martin’s Bleed-proof White Ink (already thinned with water)
  • Water-color brush, round (I use these from Winsor and Newton)

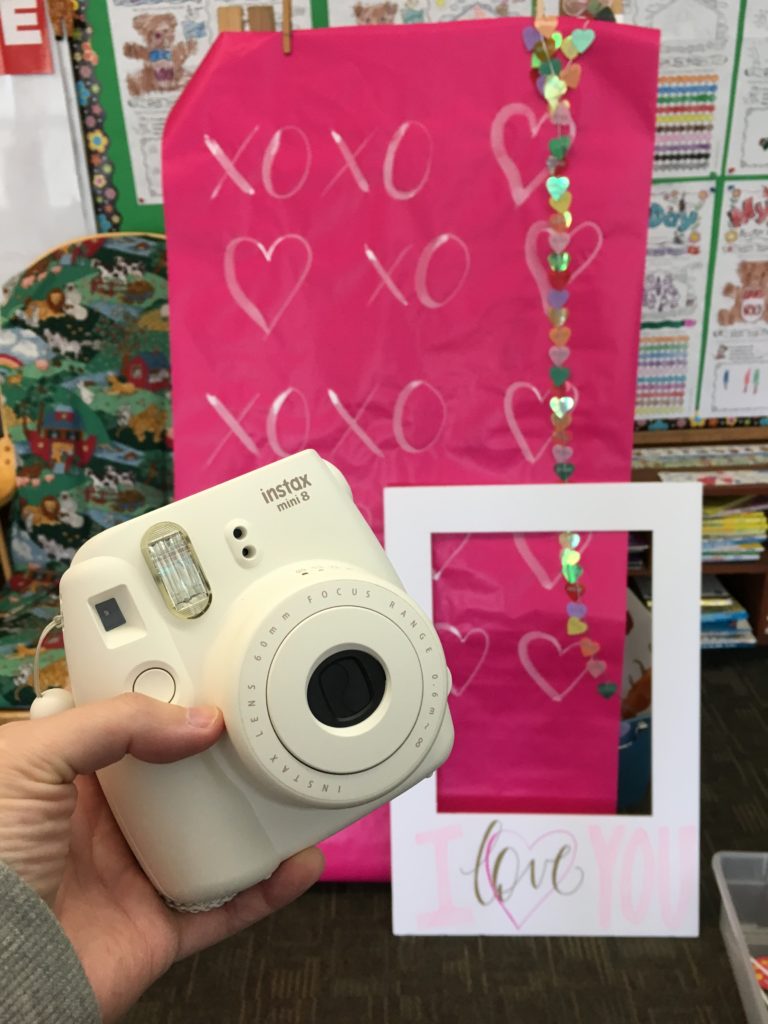
This backdrop is super easy. It doesn’t require you to have a nice hand-lettering since you’re just going to write XOXO using print uppercase letters and doodle some heart shapes.

But even something so easy, can turn out super cute!

We used some photo props like mustaches and silly glasses and I also created a white frame using a foam-board to re-create the frame of the Polaroids/Mini films.

For that frame, project you’ll need:

  • White foam board (I got this one)
  • X-acto knife
  • Pencil
  • Ruler
  • Markers (I used pink molotow and sharpie gold oil based)

Using your ruler measure then trace with the pencil a rectangle shape on the back of the foam board. Remember to leave a bigger space at the bottom, resembling the frame of a polaroid/mini film. Cut it with the X-acto knife being very careful.

Then use your markers to write the phrase of your choice at the front-bottom part of the frame-board. I wrote “I love you” but the pink didn’t show as much in the final pictures, just the word LOVE really popped.

I think this idea is a super easy DIY backdrop for photoshoots and you could even try it for other holidays! From St. Patrick’s to birthday parties!

Now, to finish this post…Here’s a time-lapse video of the brush lettering process in my garage.

See you next week friends! Happy Valentine’s Day!

***More brush-lettering ideas here.


Introducing new printable for all the mamas-to-be like me

Since about June last year, I decided that I wanted to slowly start creating more art that were meaningful to me and take less custom-orders.

Then, I got pregnant and I was super sick until week 20 and I barely created anything. But still I kept working in that direction. That’s how the “This Too Shall Pass” foil print came to life for instance.

Well, now that I was pregnant I wanted to have a registry of the moment but truth is I’ve never loved being pregnant. I don’t have a romantic view of pregnancy. Yes, of course nature is amazing and experiencing making and nurturing a little human being is out of this world. But that’s it. It’s not my favorite part of my life and that doesn’t change at all the fact that I adore my children.

Truth is pregnancies are hard for me, almost since the beginning I start feeling all the symptoms. And this pregnancy specially has been really hard with severe morning sickness, losing a lot of weight, barely eating… It was super difficult until week 20. Then it got better, I can now eat and keep my food down but of course… a lot of other symptoms came along!

Anyway. The thing that I want to share is that besides all of this I wanted to take some pictures of me and my little bump growing (slowly slowly) but never felt like to, never had the energy or a decent face to take a picture. There was no way I could do a weekly bump picture because I didn’t feel good.

That’s how I had the idea of this printable. I decided I wanted to do 3 cards for milestones of the pregnancy, I knew I wasn’t going to take the weekly bump but I could take 3 good ones in 40 weeks! That would be enough.

So, I started working in this “First, Second and Third Trimester Printable Cards

It took me longer than expected so when I had it finished, I was already in the third trimester! But I know that there must be other mamas like me in this world who would appreciate this cards too!

These printable cards are available on my etsy shop. It includes 3 (three) JPEG files (one for each trimester) and 1 (one) PDF file with the three cards. You can print them in smaller sizes (like the one I’m holding in the picture below which is 4.5inx6.5in) or even go bigger like a letter size. Maybe even framing it can be a great idea to give it a fancier look to all the beautiful flourishing!

As always, the words in the printable cards where created using my own Modern Calligraphy skills with a straight pen holder, a nikko G nib and sumie ink. Later digitized in Photoshop.

I hope you like my new product! See you next week folks!